Are your cookies always a little too crisp, or your roasts consistently undercooked? The culprit might not be your recipe, but your oven’s temperature. An accurately calibrated oven is the secret ingredient to perfect baking and cooking results, ensuring your culinary creations turn out exactly as intended, every single time. This comprehensive guide will walk you through the essential steps of checking and calibrating your oven’s temperature, helping you achieve consistent, professional-level dishes right from your kitchen.
Why Oven Calibration is Crucial for Every Baker
Achieving consistent, high-quality results in baking heavily relies on precise temperature control. An oven that runs too hot or too cold can sabotage even the most carefully followed recipes, leading to frustration and wasted ingredients. For bakers, where chemical reactions are highly dependent on exact temperatures, calibration isn’t just a suggestion—it’s a necessity.
Inaccurate oven temperatures can manifest in several ways. If your cakes sink in the middle, or the edges burn before the center cooks through, your oven might have hot spots or an incorrect overall temperature. Similarly, pastries that don’t puff up or bread that doesn’t brown evenly could be signs of an underlying calibration issue. Consistent calibration ensures that the temperature you set is the temperature you get, providing the stable environment your delicate baked goods require for perfect texture, rise, and color.
Identifying When Your Oven Needs a Temperature Adjustment
Before diving into calibration, it’s essential to recognize the signs that your oven might be out of sync. Paying attention to these indicators can save you from countless baking disappointments and signal it’s time for a check-up.
- Uneven Baking: Are your cookies browning on one side faster than the other? Does one part of a cake always seem undercooked while another is perfect? This often points to temperature inconsistencies or “hot spots” within the oven cavity, suggesting a calibration issue or at least a need to understand your oven’s unique heating patterns.
- Burnt or Undercooked Results: If your recipes consistently turn out burnt on the bottom, too dark, or conversely, always require extra cooking time to reach doneness, your oven’s internal temperature might be significantly different from the temperature you’ve set. A consistent deviation of more than 10-15 degrees Fahrenheit often warrants calibration.
- Inconsistent Cooking Times: When a recipe typically takes 45 minutes, but your oven needs 60 minutes or only 30, it’s a strong indicator that the internal temperature is off. Such discrepancies make following recipes a guessing game, which is frustrating for any home cook or baker.
- New Oven or Recent Move: New appliances, even straight from the factory, can sometimes be slightly off. Similarly, the jostling and changes in environment during a move can affect an oven’s sensor and calibration. It’s a good practice to check calibration in these scenarios.
Recognizing these symptoms is the first step toward rectifying the problem and bringing your oven back to its optimal performance, ensuring your baked goods emerge perfectly every time.
Essential Tools for Accurate Oven Calibration
Calibrating your oven doesn’t require a professional technician or expensive equipment. With a few basic tools, you can accurately assess and adjust your oven’s temperature yourself. The most critical piece of equipment is a reliable oven thermometer.
- Oven Thermometer: This is non-negotiable. An oven thermometer, specifically designed to withstand high temperatures and be placed inside the oven, is your primary diagnostic tool.
- Analog Thermometers: These are generally affordable and widely available. While useful for general readings, some high-quality digital options offer faster and potentially more accurate measurements. Look for models with clear, easy-to-read dials.
- Digital Thermometers with Probes (Optional but Recommended): For the most precise readings, a digital thermometer with an external probe (often called a K-type thermocouple) can be invaluable. These react faster to temperature changes and can provide continuous readings, allowing you to observe the oven’s temperature cycling.
- Screwdriver (Phillips Head): Necessary for analog ovens where calibration often involves adjusting a screw on the back of the temperature knob.
- Owner’s Manual: Absolutely crucial for digital ovens. Your oven’s manual will contain specific instructions on how to access the calibration menu and make temperature adjustments. Without it, attempting to calibrate a digital oven can be a frustrating and potentially fruitless endeavor.
- Timer: To accurately monitor the time your oven runs after preheating before taking readings.
- Pen and Paper / Spreadsheet: To record temperature readings over time and calculate any necessary adjustments. This helps in tracking consistency and ensuring precise changes.
Having these tools on hand will make the calibration process straightforward and help you achieve the accurate temperature readings needed for a perfectly tuned oven.
Step-by-Step Guide to Calibrating Your Oven
Calibrating your oven can seem daunting, but it’s a straightforward process that yields significant improvements in your baking. Follow these steps carefully to ensure accuracy.
1. Prepare Your Oven and Thermometer
|
Our Picks for the Best Oven in 2026
As an Amazon Associate I earn from qualifying purchases.
|
||
| Num | Product | Action |
|---|---|---|
| 1 | Breville BOV900BSS Smart Oven Air Fryer Pro and Convection Oven, Brushed Stainless Steel |

|
| 2 | Elite Gourmet ETO-4510M French Door 47.5Qt, 18-Slice Convection Oven 4-Control Knobs, Bake Broil Toast Rotisserie Keep Warm, Includes 2 x 12" Pizza Racks, Stainless Steel |
|
| 3 | Emeril Lagasse Extra Large French Door Air Fryer Toaster Oven Combo, 24 Cooking Functions and Digital Controls, 7 Accessories Included, Stainless Steel Finish, 26QT Capacity |
|
| 4 | Gourmia French Door Air Fryer Oven - 37 Qt Large Capacity Convection Toaster Oven, FryForce 360°, Digital Display, 12 Cooking Presets, Dehydrate, Fits 13” Pizza, Dishwasher-Safe, Stainless Steel |
|
| 5 | BLACK+DECKER Crisp 'N Bake Air Fry Countertop Convection Toaster Oven, Medium Capacity, 4-Slice, 5-in-1, Fits 9” Pizza, 30-Min Timer, Bake, Broil, Air Fry, Toast, Keep Warm, Stainless Steel |
|
| 6 | Ninja Air Fryer Toaster Oven Combo | 8-in-1 Functionality | Flip Up & Away for Storage Space | Air Fry Basket, Sheet Pan, Wire Rack & Removable Crumb Tray |1800 Watt | Stainless Steel | SP151 |
|
| 7 | Ninja Air Fryer & Toaster Oven Combo | 10-in-1 Prestige Smart XL Countertop Oven | Bake up to 20 Cookies, Fit up to a 12lb Turkey | Pizza, Toast, Bake, Dehydrate | 1800 Watt | Stainless Steel | DT501 |
|
| 8 | Cuisinart Air Fryer Toaster Oven, 1800W, 8-in-1 with Air Fry, Convection, Broil & Warm, 0.6 Cubic Feet, 60-Minute Timer, TOA-70NAS, Stainless Steel |
|
| 9 | BLACK+DECKER TO3250XSBD 8-Slice Extra Wide Convection Countertop Toaster Oven, Includes Bake Pan, Broil Rack & Toasting Rack, Stainless Steel/Black |
|
| 10 | BLACK+DECKER Crisp 'N Bake Air Fryer Toaster Oven Combo, 12 in 1 Countertop Convection Oven Cooks Food Fast, Fits a Whole Pizza or 6 Toast Slices, French Doors with Stainless Steel Finish |
|
Begin by positioning one of your oven racks in the very center of the oven. This ensures your thermometer is placed where most of your baking typically occurs, providing a representative temperature reading. Carefully center your oven-safe thermometer directly on this rack. Ensure it’s not touching the oven walls or any heating elements, as this could skew the temperature reading.
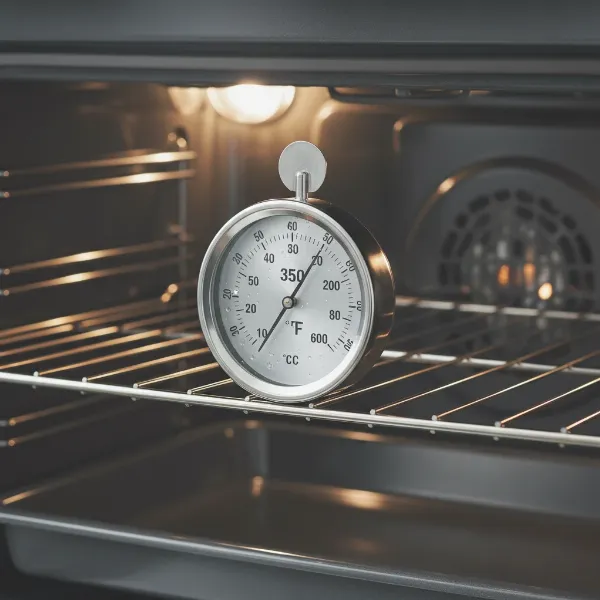 A close-up of an oven thermometer inside a preheating oven, showing a temperature reading for calibration.
2. Preheat the Oven and Stabilize Temperature
Close the oven door and set your oven to a common baking temperature, such as 350°F (177°C). Allow the oven to preheat fully until the indicator light or sound signals it has reached the set temperature. Crucially, do not open the oven door during this phase. After the initial preheat, let the oven continue to run for an additional 20-30 minutes. Ovens cycle on and off to maintain temperature, and this stabilization period allows the internal temperature to settle and provide a more accurate average reading.
3. Take and Record Temperature Readings
After the stabilization period, read the temperature displayed on your oven thermometer. If possible, do this by looking through the oven window to minimize heat loss. If you must open the door, do so quickly and efficiently. Record this reading, along with the time. For increased accuracy, take several readings over another 20-30 minute period, approximately every 10 minutes, noting the fluctuations. An oven’s temperature naturally oscillates above and below the set point, so an average of these readings will give you the most accurate assessment of its true temperature.
4. Calculate the Temperature Offset
Once you have your readings, compare the average temperature displayed on your thermometer with the temperature you initially set the oven to (e.g., 350°F). The difference is your temperature offset.
- If your thermometer consistently reads higher than the set temperature, your oven is running hot.
- If it reads lower, your oven is running cold.
A deviation of more than 10-15°F (approximately 5-8°C) typically indicates that calibration is needed.
5. Adjust Your Oven’s Thermostat (Analog Controls)
For ovens with analog knobs, calibration often involves a simple mechanical adjustment.
- Remove the Knob: Gently pull the temperature control knob straight off its shaft.
- Locate Adjustment Screws/Shaft: Turn the knob over. You should find one or two small screws on the back, or a small shaft in the center. Some models may have a small metal dial.
- Make Small Adjustments:
- If your oven is running hot, turn the screw(s) or shaft clockwise to decrease the temperature.
- If your oven is running cold, turn the screw(s) or shaft counterclockwise to increase the temperature.
- Make very small adjustments, typically an eighth of a turn at a time. Even a slight turn can significantly alter the temperature.
- Replace and Retest: Push the knob back onto the oven, then repeat steps 1-4 to retest the temperature and verify your adjustment. Continue this iterative process until your oven thermometer closely matches the set temperature.
6. Calibrate Digital Ovens (Consult Owner’s Manual)
Digital ovens require a different approach, usually involving access to a special calibration menu.
- Refer to Your Manual: This step is paramount. Your owner’s manual will provide precise instructions for entering the calibration mode (often by holding down certain buttons like “Bake” and “Broil” simultaneously or navigating through a “Settings” menu).
- Adjust the Offset: Once in calibration mode, you will typically use arrow keys or +/- buttons to adjust the temperature offset. This tells the oven’s computer to compensate for the detected discrepancy.
- Save Settings: Follow the manual’s instructions to save the new calibration setting.
- Retest: Just like with analog ovens, retest the temperature to confirm the adjustments have been effective.
If you are uncomfortable with DIY adjustments or your oven manual is missing, consider contacting an appliance repair professional. They have specialized tools and expertise to calibrate your oven safely and accurately.
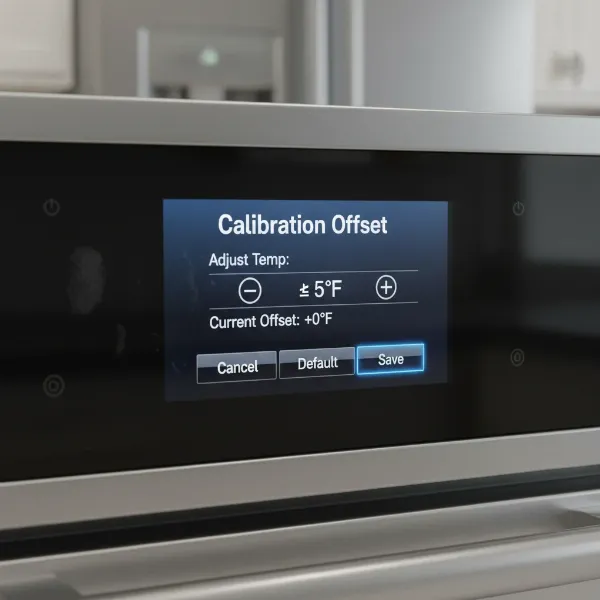 A digital oven display showing a calibration menu with temperature offset adjustment options.
Understanding Oven Temperature Fluctuations for Better Baking
Even a perfectly calibrated oven isn’t a static heat box; internal temperatures naturally fluctuate. Understanding these dynamics can significantly improve your baking and help you compensate for unavoidable variations. Ovens heat in cycles: the heating elements turn on until a certain temperature is reached, then turn off until the temperature drops below a threshold, before turning back on. This constant on-off cycle means the temperature within your oven is rarely precisely what you set it to at any given moment, but rather averages out around that point.
Natural Variations and Hot/Cold Spots:
- Cycling: Expect your oven’s temperature to vary by about 15-25 degrees Fahrenheit (8-14°C) around the set point. Your oven thermometer will display these shifts. The goal of calibration is to ensure the average of these cycles is correct.
- Hot and Cold Spots: Most ovens, especially older models, have areas that heat more intensely than others. This can be due to uneven heating element distribution, ventilation, or insulation. You might notice cookies browning faster in the back of the oven or cakes rising more on one side.
- Mitigation Strategies: To counter hot and cold spots, try rotating your baking sheets or dishes halfway through the cooking time. Using a baking stone or steel can also help by providing a more even, consistent heat surface. Avoid overcrowding the oven, which can obstruct airflow and exacerbate uneven heating.
By understanding these inherent characteristics of oven heating, you can adapt your baking techniques and achieve more consistent results, even if absolute precision is an elusive ideal.
When to Recalibrate Your Oven for Peak Performance
Oven calibration isn’t a one-and-done task. Over time, components can age, and even minor disturbances can throw off your oven’s accuracy. Knowing when to perform a recalibration check ensures your oven remains a reliable partner in the kitchen.
- Annually: A good rule of thumb is to check your oven’s calibration at least once a year. This proactive approach helps catch minor deviations before they significantly impact your baking.
- After Moving or Significant Appliance Work: If your oven has been moved, or if any major repairs or part replacements (like a new heating element or temperature sensor) have been performed, it’s wise to recalibrate. The change in environment or new components can affect its temperature accuracy.
- Noticeable Changes in Baking Results: If you suddenly find your tried-and-true recipes consistently failing—cookies burning, cakes underdone, roasts requiring vastly different cooking times—and you haven’t changed anything else, it’s a strong indicator that your oven’s temperature is no longer accurate.
- With a New Oven Thermometer: If you invest in a new, high-quality oven thermometer, it’s a good idea to perform a calibration check. While the thermometer itself shouldn’t require calibration, its more accurate reading might reveal existing discrepancies in your oven that a less precise thermometer might have missed.
Regular checks and prompt recalibration keep your oven performing at its best, ensuring delicious and consistent results for all your culinary endeavors.
| Feature | Manual Calibration (Analog Ovens) | Digital Calibration (Digital Ovens) | Professional Calibration |
|---|---|---|---|
| Complexity | Low to Moderate | Moderate (requires manual) | Low (for the user) |
| Cost | Low (thermometer, screwdriver) | Low (thermometer) | Moderate to High (service fee) |
| Tools Needed | Oven thermometer, screwdriver | Oven thermometer, owner’s manual | Specialized equipment, expert technician |
| DIY Feasibility | High | Moderate (if manual is available) | Low (requires expertise) |
| Precision | Good, with patience and repeated testing | Very good, based on internal offset | Excellent, often with advanced diagnostics |
| Ideal For | Home bakers comfortable with small adjustments | Modern kitchens with accessible manuals | Complex issues, warranty concerns, or lack of confidence |
“An oven thermometer is the baker’s best friend. You can’t fix what you can’t measure, and even new ovens can be off by 25 degrees or more.” – Stella Parks, Award-Winning Pastry Chef and Cookbook Author
Conclusion
An accurately calibrated oven is more than just a convenience; it’s a cornerstone of successful baking. By understanding why temperature precision matters, recognizing the signs of an uncalibrated oven, and following our step-by-step guide, you can take control of your kitchen and elevate your culinary creations. Whether you’re making minor adjustments to an analog dial or navigating digital menus, the effort invested in oven calibration will pay off in perfectly baked goods and consistent results.
Don’t let an unpredictable oven ruin your baking ambitions. Take the time to check and calibrate your appliance, turning guesswork into gourmet. How will mastering your oven’s true temperature transform your next baking project?
Frequently Asked Questions
How often should I calibrate my oven?
It is recommended to check your oven’s calibration at least once a year, or whenever you notice inconsistencies in your baking results. New ovens or those that have recently been moved should also be checked as a best practice to ensure accuracy from the start.
What is an acceptable temperature deviation for an oven?
Most experts consider a temperature deviation of up to 10-15 degrees Fahrenheit (5-8°C) to be within a normal range due to natural oven temperature cycling. However, consistent deviations greater than this warrant calibration for optimal baking performance.
Can I calibrate a digital oven without the owner’s manual?
Calibrating a digital oven without the owner’s manual can be challenging as the procedure to access the calibration menu varies significantly between models and brands. It’s highly recommended to locate your manual or search for it online to ensure you follow the correct, manufacturer-specific steps.